Using the QuickDog "Builder" - The "Column Builder"
This Tutorial will take several minutes to download if you are using a Modem. Please be patient, go make a sandwich or get a cup of coffee. There are a lot of screen shots in the tutorial so it will take time to download.
Column - Definition - A series of STEPS which the user creates. Each STEP includes an item of DATA, a COMPONENT, which is a calculation using that data, and an ACTION which either stores that data for later use or combines it with data in a preceding step. A column may include just a single STEP or as many as 100 STEPS.
As an introduction to our column builder, the reader might wish to become familiar with a programming concept introduced in Hewlett Packard Calculators called "Reverse Polish Notation" or RPN. Go to this link to learn more about RPN if you are not familiar with it already. This link will search Google for RPN references.
http://www.google.com/search?hl=en&ie=UTF-8&oe=UTF-8&q=%22reverse+polish+notation%22+rpn
Learning about RPN will help you learn to use our COLUMN BUILDER much more quickly.
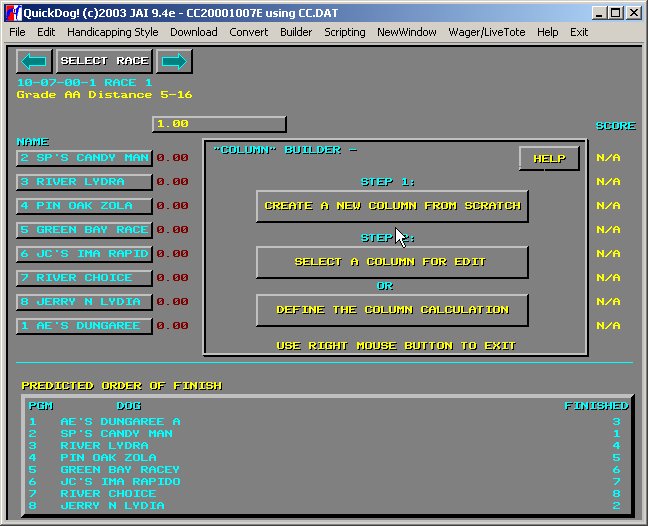
For purposes of this discussion we shall again return to our CC20001007 program which is a 13 race program. The user should then select the "Builder" Menu Bar item, and then the "Build_Column" menu item. Click on this to display the "Column" Builder Menu as it appears below in Fig. 1.
Figure 1 - Column Builder 1st Menu
We wish to build a Column from scratch using this online help, so select the button labeled "CREATE A NEW COLUMN FROM SCRATCH". Figure 2 then appears as shown below.
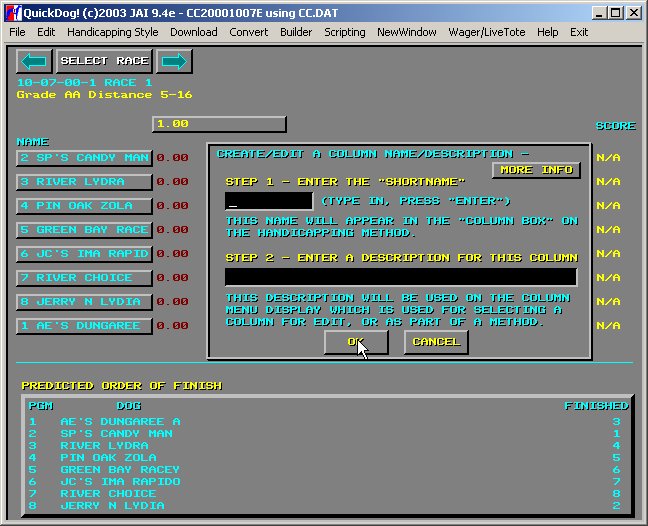
Figure 2 - Identifying your New Column
The first step in creating a new COLUMN is to identify it using two items of information. The "shortname", a 10 character name, and a description. The shortname will be used to create a filename for this COLUMN. The description will be used to create a menu of all your columns so that you can tell what this column does. Therefore, make sure your description describes your COLUMN so that you will recognize it later.
For this tutorial exercise, type in "COLUMN01" as the shortname, make sure you press ENTER after you type in this shortname. Then, for a description, type in "QUICKDOG SAMPLE COLUMN". Once again, type ENTER to enter this information. Look over the information and if you need to, retype it to make any corrections. Once you are finished, click on the OK button beneath the entered information. If you've followed these simple directions, you will see Figure 3, shown below.
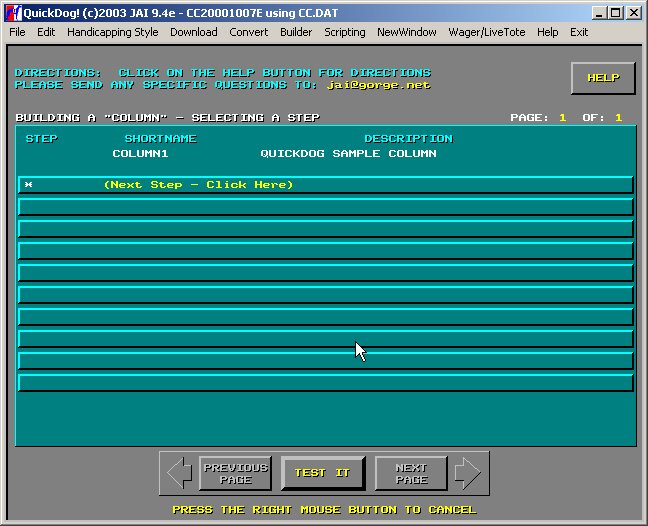
Figure 3 - Building a Column, Defining a Step
Notice your shortname, and description appear to let you know which Column you are working on. Also, notice that there are NO STEPS yet. That's your next "mission" - to add a STEP to your brand new Column. You are directed to "Next Step - Click Here". That's pretty easy to follow, so go ahead and click on that prompt. You are about to create Step 1 of your Column.
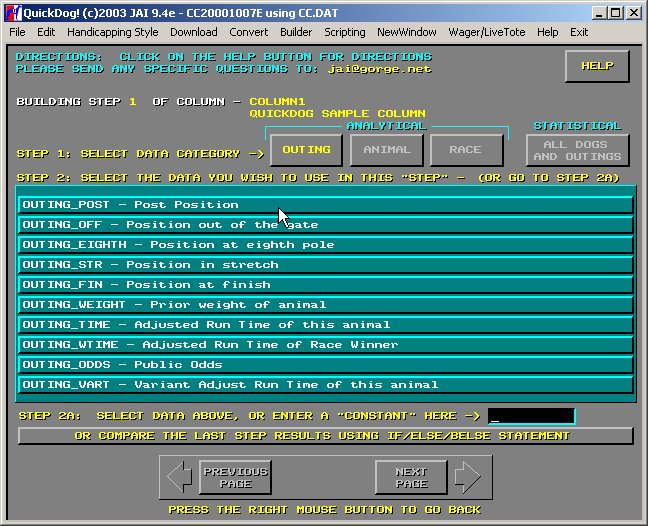
Figure 4 - Step 1 of "Building a Column Step" - Selecting Handicapping Data
As mentioned previously, one of the things necessary in order to build a step is to select the data you wish to use in a step. When you downloaded data from the internet, and QuickDog converted it for you, all the data shown in the list above is available. There are several pages of data, and 4 types of data. The "types of data" include "OUTING data", "ANIMAL data", "RACE data", and the combination of "ALL DOGS AND OUTINGS data". You will notice these 4 items have buttons and that the button labeled OUTING is in YELLOW. The remaining 3 are in light grey. The YELLOW color indicates that the data items displayed are data items related to OUTING (in this case). Now, click on the button labeled ANIMAL, and note the change in the display. Then click on the RACE button, note the display, then also on the "ALL DOGS AND OUTINGS" and notice what happens.
A basic item in Column building is to become familiar with the DATA that is available. Once you know what is available you can write to us and ask us to add more data. We don't include all of the Racing data right now. Some of it isn't useful in a computer, and other parts of it we feel are not useful. But, if you feel we've left important data out, then contact us and let us know.
You might wish to take this opportunity to look over all the data currently included. Once you have done so, or are otherwise interested in moving on, RESELECT the ANIMAL button and the display below shall appear.

Figure 5 - Displaying QuickDog ANIMAL Data
Now, we want to select the data item "ANIMAL_FIRST". You must locate this item in the DATA LIST shown. Notice the PAGE Buttons at the bottom of the list of data. If you need to use those right now then do so to locate this data item. Keep in mind, it may be on this first page of data. Once you find it, click on it.
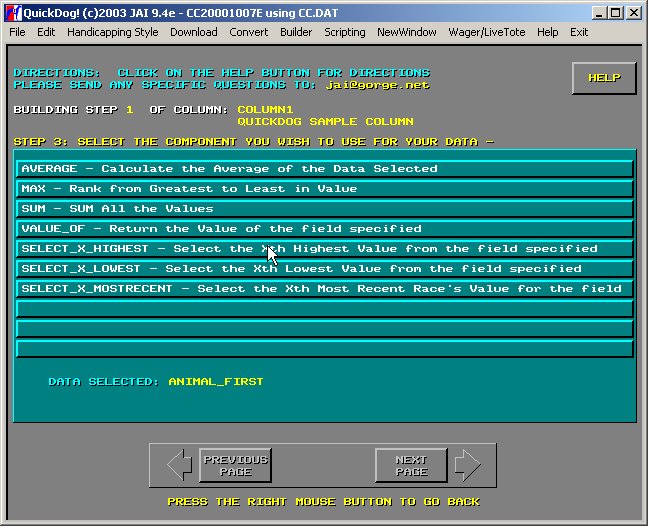
Figure 6 - Choosing a "COMPONENT" from QuickDog's Library of Components
Notice, a new menu has appeared. Once again it displays the STEP you are building (Step 1), the shortname, "COLUMN01" and description of your column, "QUICKDOG SAMPLE COLUMN". In addition, it now shows the "DATA SELECTED" as "ANIMAL_FIRST". Now, we must decide upon a "component" so that QuickDog "knows" what to do with the "ANIMAL_FIRST" data. At this point you are getting a feel as to the STEP BY STEP nature of building a column. QuickDog automatically takes you through these steps. This is to try to avoid errors.
The menu shown above only displays 4 COMPONENTS. As time goes on we hope to add more as new users request them. In the meantime we'll use one of these 4 to continue this tutorial.
Look for a component called "VALUE OF - Return the Value of the field specified". This may be on the first page, or you may have to use the NEXT PAGE button. Once you locate it and click on it, the following will be displayed.
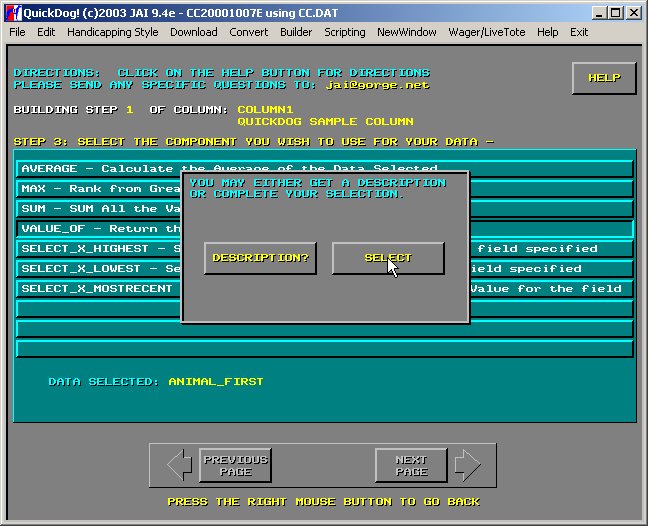
Figure 7 - Finding out WHAT the VALUE_OF Component does
We realize that not much can be known about a component merely by seeing its NAME and DESCRIPTION. Therefore, we offer additional information on a component and using this popup, you may select the "DESCRIPTION?" of this component. What will happen is that NOTEPAD will then display a full description of that this component will do to the data you have picked out. Click on the DESCRIPTION? button and see for yourself, then CLOSE the NOTEPAD WINDOW and continue by re-selecting the "VALUE_OF" Component and this time select the "SELECT" Button rather than the "DESCRIPTION?" button.
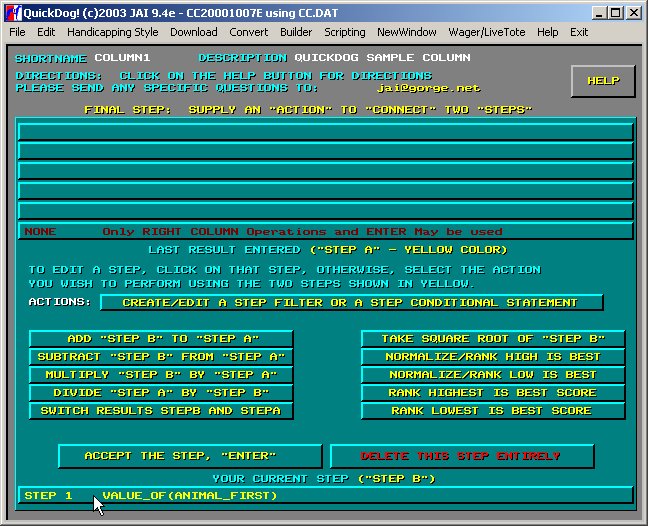
Figure 8 - Final Step - Specify an ACTION on the Component(Data)
Ah, another step in the Column Process, the final step menu which will add an ACTION to the Component and Data you have selected. Notice where the cursor is pointing in the above Figure. This is the current step you are working on. Notice it reads "VALUE_OF(ANIMAL_FIRST)" which indicates that the COMPONENT "VALUE_OF" is used to "operate" on the DATA - "ANIMAL_FIRST". And now what? What do we do now with this RESULT?
Well, the answer is, you must now SPECIFY an ACTION. ACTIONS are processes which can take place either ON the current STEP (Step 1 in this case) or the ACTION can take place on 2 steps. For example, an ACTION such as - TAKE SQUARE ROOT OF "STEP B" - will calculate the square root of each value obtained by the COMPONENT shown in the button - YOUR CURRENT STEP ("STEP B") - which is our STEP 1 (bottom of the display above).
In other words, the VALUE_OF component has found a value of ANIMAL_FIRST (the number of times each dog has come in first) for each dog, and you wish now to take the square root of those numbers (1 for each dog). If this was the case, your ACTION would be to simply click on the "TAKE THE SQUARE ROOT" button.
Basically, the ACTIONS shown on the RIGHT side of this menu all operate on a single step, "STEP B" as it is called, or your current step. The ACTIONS on the LEFT side all require TWO STEPS in order to be used. The remaining ACTIONS, "ACCEPT THIS STEP - ENTER" and "DELETE THIS STEP ENTIRELY" (shown in red and hard to read), also work on STEP B, your current step. Each ACTION is explained if you click on the HELP button on this display. Now let's continue with the tutorial.
Since we only have 1 step so far, and we don't wish to do anything more to it, we use the "ACCEPT THE STEP - ENTER" action. Next we will create another step and then we'll have 2 steps which we can ADD together. Click on the ENTER action button.
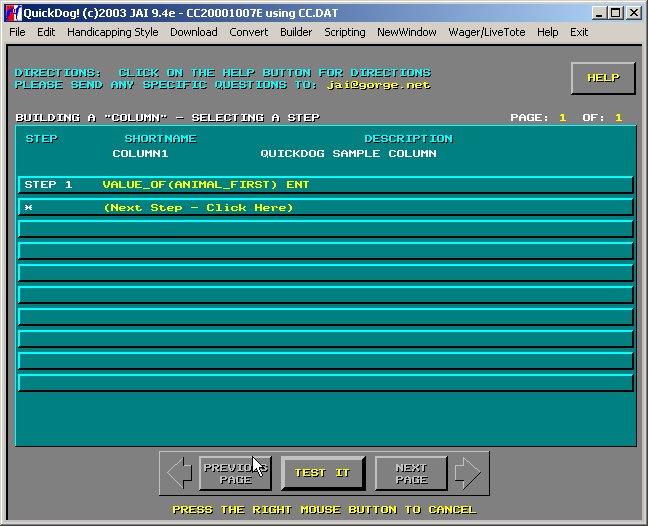
Figure 9 - Back to the Beginning and Adding another STEP to our Column
You've seen this display before. However, now it includes a "shorthand" of the first step we've created. Notice the COMPONENT name - VALUE_OF, the DATA name - ANIMAL_FIRST, which is in parenthesis, and our ACTION which was ENTER. Unless we are finished, we must now create a second step, then we can use an ACTION to DIVIDE Step 1 to what is calculated in Step 2. Click on the "(Next Step - Click Here) button to continue.
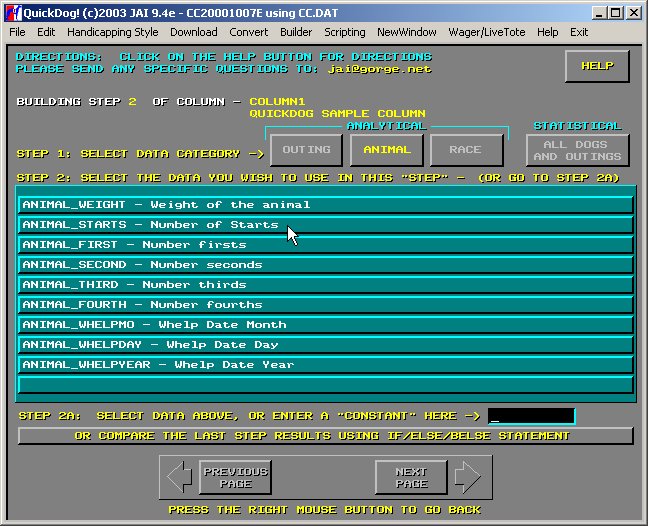
Figure 10 - Selecting the STARTS Data Item
Now we will complete our COMPONENT by selecting a SECOND data item, the ANIMAL_STARTS data item. What we wish to do is divide ANIMAL_FIRST by ANIMAL_STARTS to create the PERCENTAGE of Wins for each dog. But let's not get ahead of ourselves, ONE STEP at a time, so we don't make mistakes! Click on ANIMAL_STARTS. Follow that with selecting the VALUE_OF component again, just as you did for the ANIMAL_FIRST data item earlier. After "selecting" the VALUE_OF component, the following will be displayed.
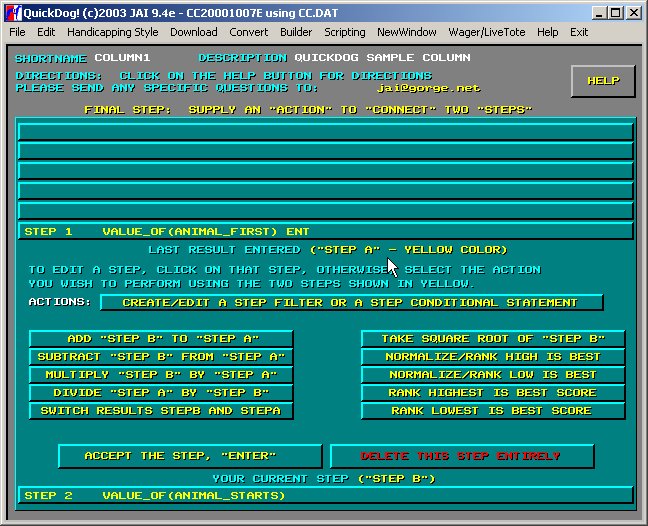
Figure 11 The ACTION Display with Steps A and B
Notice Step B is the "VALUE_OF(ANIMAL_STARTS)". Now that we have at least 2 steps in our COLUMN, we may now use the ACTIONS on the left side of this display, such as ADD or SUBTRACT, MULTIPLY, and DIVIDE. If you read the information on this display, then you will realize you can DIVIDE the VALUE_OF(ANIMAL_FIRST) by the VALUE_OF(ANIMAL_STARTS), but simply choosing the MULTIPLY "STEP B" by "STEP A" button.
Go ahead and click on the DIVIDE button and notice the change in the display.
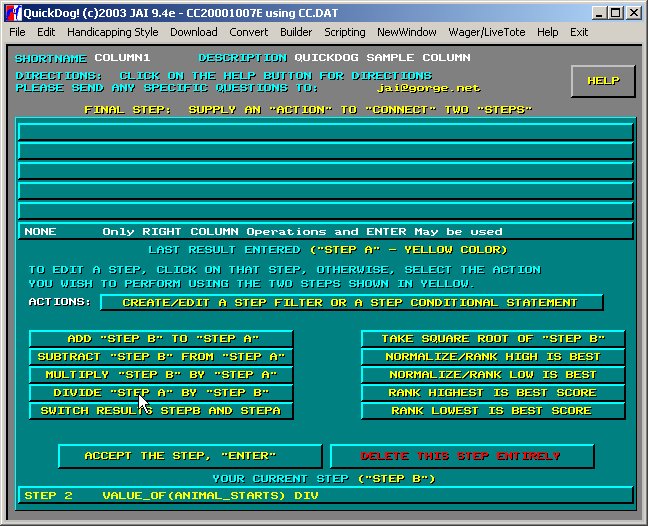
Figure 12 - Step 2 now includes the DIV shorthand
If you look at STEP 2, you will notice that the DIV shorthand appears at the end of it. But also notice that there is no longer a "STEP A" for you to use. Basically you have already used up that data by dividing it by Step 2.
Therefore, at this point all you can do is ENTER (or delete the step, but we don't want to do that). You may also use the ACTIONS listed in the right hand column. Select the "ACCEPT THE STEP, ENTER" button. Once again you've returned to the "Step Selection Menu" which also displays your COLUMN as it is to this point.

Figure 13 - Your Method now has 2 Steps
Let's read this COLUMN recipe at this point. Here's how it reads:
Step 1 - Find the values of the number of FIRST place finishes for EACH DOG.
Step 2 - Divide each of these values by the number of STARTS for EACH DOG.
This will produce a value from 0 to 1 or ???? if there are NO STARTS for a dog.
Because you have used all your data, then you have a complete COLUMN at this point. You can either add more steps, or you can test this COLUMN by using the "TEST IT" button. Click on the TEST IT button right now.
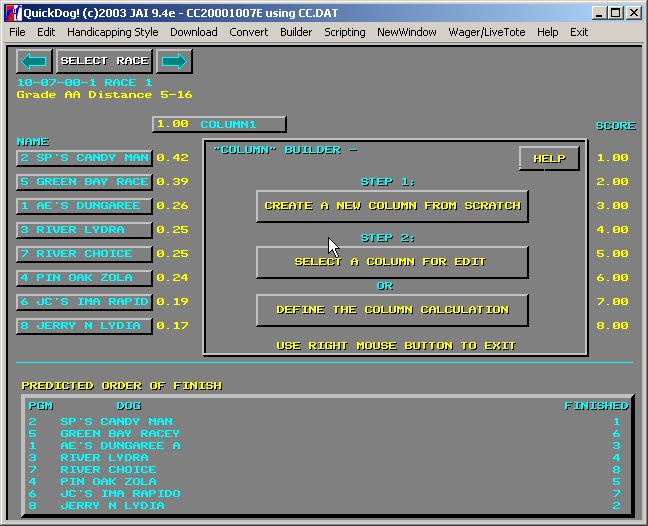
Figure 14 - This is what your Column would look like on a Method
Notice each dog has a value which has been computed. Also, the dogs are now listed in order of highest number to lowest number. The value for each dog is simply the Number of FIRST Place Finishes divided by the total number of STARTS. Note also, the YELLOW color of this data. This COLOR indicates a COLUMN is complete. If the column had not been complete then these values would be in a RED color. To continue working on your column, simply click on the "DEFINE THE COLUMN CALCULATION" button. Even though a COLUMN is complete, you may ADD MORE STEPS TO IT.
Suppose we'd like to present the numbers shown in Figure 14 in PERCENT rather than a number from 0 to 1.
What we want to do, then, is MULTIPLY each number by 100. How do we add this step to our COLUMN?
To begin with, select the "DEFINE THE COLUMN CALCULATION".
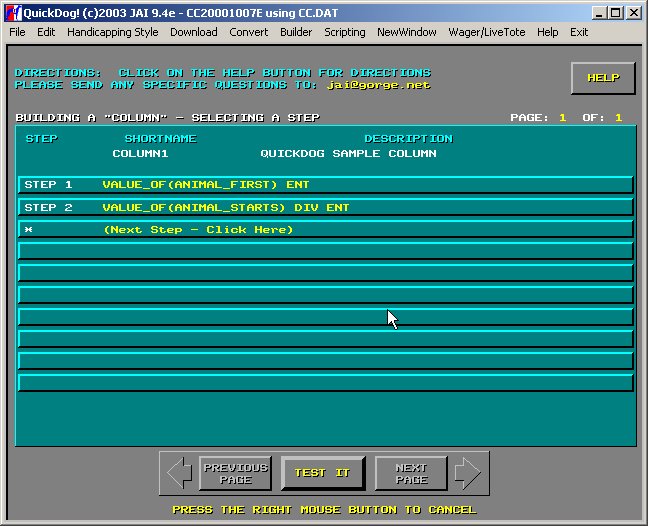
Figure 15 - Ready to Build the Next Step, Multiply by 100
Next, select NEXT STEP. This is where we wish to create the MULTIPLIER of 100.

Figure 16 - Entering a "constant" of 100
Notice, in Figure 16, "STEP 2A". We are not selecting RACE DATA as we did before. Instead, we are entering a CONSTANT of 100. Simply type in 100 and PRESS the ENTER KEY (make sure you press the ENTER KEY).
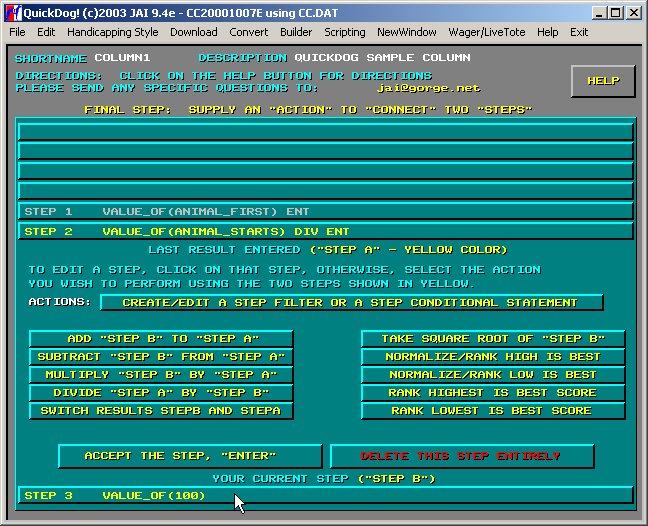
Figure 17 - Step 3, the VALUE_OF(100)
Notice in Figure 17, our three steps, and the color coding of them.
In a pale GRAY, you have STEP 1. STEPS 2 and 3 are in YELLOW. This color coding tells you that STEP 2 has already combined the RESULT of STEPS 1 and 2, and that now, STEP 3 is going to be combined with STEP 2 if you select one of the OPERATIONS in the LEFT HAND column, ie, ADD, SUBTRACT, MULTIPLY, DIVIDE (or SWITCH).
What do we want to do? Multiply, right? So, select the MULTIPLY "STEP B" BY "STEP A" button, and note the change in display.
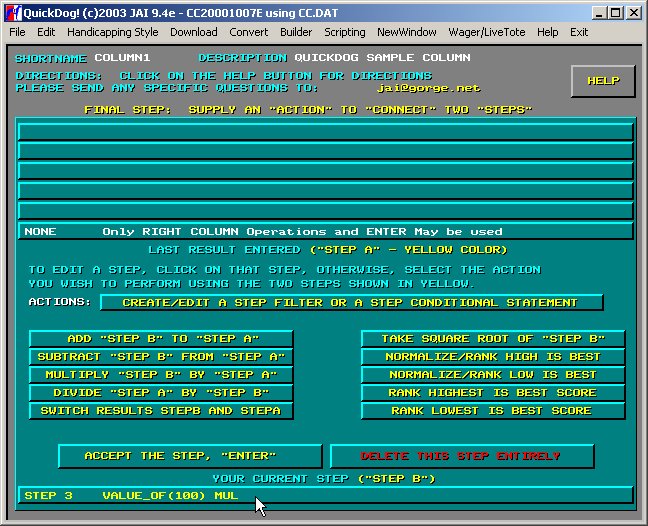
Figure 18 - Column is Once Again "Complete" (after you select ENTER)
Notice what happens to Steps 1 and 2, AFTER you select the MULTIPLY button. They disappear! Why?
Because they've all 3 been combined in the RESULT of Step 3. This is an example of how a COLUMN should look when it is COMPLETE on this display. Only the final step shows, and you see the message in WHITE saying "NONE Only the RIGHT COLUMN Operations and ENTER May be used" when you look for other preceding steps.
We now "ACCEPT" this step by SELECTING the "ENTER" button.
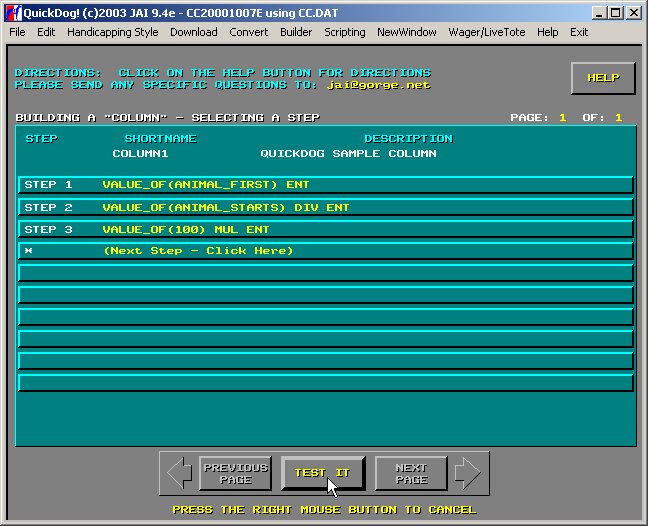
Figure 19 - Column is once again "Complete"
Now, we can review our COLUMN - Step 1 Take the number of FIRST place finishes, then Step 2, Divide that value by the Total Number of Starts, then Step 3, that that result (results are created using the ENTER key), and Multiply by 100. Looks GREAT! Now, let's see what happens to the numbers! TEST IT!!
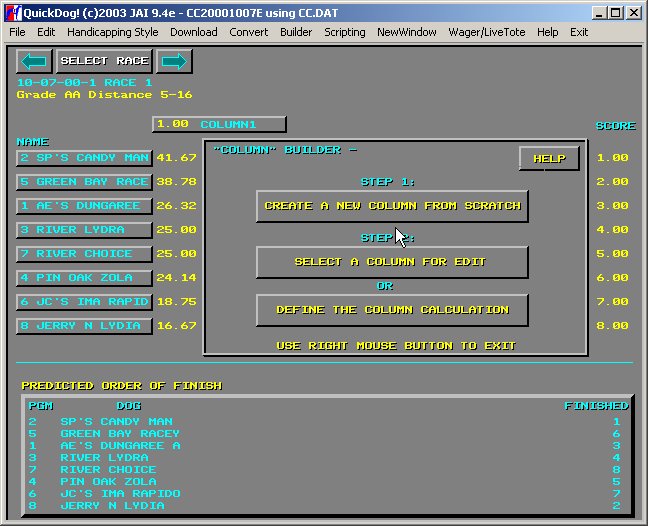
Figure 20 - Note the values are now 0-100%
Now, you've produced a working COLUMN. And it may be used to create a METHOD.
Do NOT attempt to use an INCOMPLETE COLUMN within a Method. It could ABORT QuickDog.
With our current COLUMN all we've done is "(FIRSTS divided by STARTS) multiplied by 100", which converts the previous calculation to a Percentage. Of course this may not be necessary, but it just demonstrates how to use handicapping data with CONSTANT data. In this case multiplying by 100.
You should now use the COLUMN builder to try to create your own calculations. Remember that when you test, a RED color in the values indicates you have NOT COMPLETED your COLUMN. Which means that not all of the data has been used. The column ENDS ABRUPTLY.
Since we continue to work on this feature (ie as of 12/2003 we've now added IF/THEN/BELSE commands to it), we could have bugs in the software so we want to work with new users and see if we can get this working ok for everybody. If you'd like to send us your COLUMN calculation, it is a FILE in the \jaiddog\columns folder and is named as follows: "shortname + ".COL". As an example, the column calculation we just created is called "\jaidog\columns\COLUMN.COL". Find it by using the Windows My Computer Icon, or do a SEARCH for it. You can also use the above information to share your columns with other QuickDog users. Simply send attachments through your email and other users can save those attachments in the \jaidogs\columns folder. QuickDog will then list them.
After you have created a number of COLUMN calculations, you can then create a METHOD.
Click HERE to learn about creating a Method using your columns.
As always we invite your questions and comments via email - jai@gorge.net
Copyright 2003 JONSOG associates, Inc. PO Box 911, Lyle, WA 98635 Last Updated on - 12/21/2003